部署客户端渲染的应用程序
如果你一直在构建一个仅使用客户端渲染的应用程序,使用 Trunk 作为开发服务器和构建工具,那么这个过程非常简单。
trunk build --release
trunk build 将在 dist/ 目录中创建许多构建工件。将 dist 发布到网上的某个地方应该是部署你的应用程序所需的全部内容。这应该与部署任何 JavaScript 应用程序非常相似。
我们创建了几个示例存储库,展示了如何设置 Leptos CSR 应用程序并将其部署到各种托管服务。
注意:Leptos 不认可使用任何特定的托管服务——你可以随意使用任何支持静态站点部署的服务。
示例:
Github Pages
将 Leptos CSR 应用程序部署到 Github Pages 是一件很简单的事情。首先,转到你的 Github 仓库的设置,然后点击左侧菜单中的“页面”。在页面的“构建和部署”部分,将“来源”更改为“Github Actions”。然后将以下内容复制到文件 .github/workflows/gh-pages-deploy.yml 中
Example
name: Release to Github Pages

on:
  push:
    branches: [main]
  workflow_dispatch:

permissions:
  contents: write # 允许写入 gh-pages 分支。
  pages: write
  id-token: write

# 只允许一个并发部署,跳过正在进行的运行和最新排队的运行之间排队的运行。
# 但是,不要取消正在进行的运行,因为我们希望允许这些生产部署完成。
concurrency:
  group: "pages"
  cancel-in-progress: false

jobs:
  Github-Pages-Release:

    timeout-minutes: 10

    environment:
      name: github-pages
      url: ${{ steps.deployment.outputs.page_url }}

    runs-on: ubuntu-latest

    steps:
      - uses: actions/checkout@v4 # 检出代码库

      # 安装 Rust Nightly 工具链,包括 Clippy 和 Rustfmt
      - name: Install nightly Rust
        uses: dtolnay/rust-toolchain@nightly
        with:
          components: clippy, rustfmt

      - name: Add WASM target
        run: rustup target add wasm32-unknown-unknown

      - name: lint
        run: cargo clippy & cargo fmt


      # 如果使用 tailwind...
      # - name: Download and install tailwindcss binary
      #   run: npm install -D tailwindcss && npx tailwindcss -i <INPUT/PATH.css> -o <OUTPUT/PATH.css>  # 运行 tailwind


      - name: Download and install Trunk binary
        run: wget -qO- https://github.com/trunk-rs/trunk/releases/download/v0.18.4/trunk-x86_64-unknown-linux-gnu.tar.gz | tar -xzf-

      - name: Build with Trunk
        # "${GITHUB_REPOSITORY#*/}" 计算为存储库的名称
        # 使用 --public-url something 将允许 trunk 修改所有 href 路径,例如从 favicon.ico 到 repo_name/favicon.ico 。
        # 这对于将站点部署到 username.github.io/repo_name 的 github pages 是必要的,并且所有文件都必须作为 favicon.ico 相对请求。
        # 如果我们跳过 public-url 选项,href 路径将改为请求 username.github.io/favicon.ico,这显然会返回错误 404 未找到。
        run: ./trunk build --release --public-url "${GITHUB_REPOSITORY#*/}"


      # 部署到 gh-pages 分支
      # - name: Deploy 🚀
      #   uses: JamesIves/github-pages-deploy-action@v4
      #   with:
      #     folder: dist


      # 使用 Github 静态页面部署

      - name: Setup Pages
        uses: actions/configure-pages@v4
        with:
          enablement: true
          # token:

      - name: Upload artifact
        uses: actions/upload-pages-artifact@v2
        with:
          # 上传 dist 目录
          path: './dist'

      - name: Deploy to GitHub Pages 🚀
        id: deployment
        uses: actions/deploy-pages@v3
有关部署到 Github Pages 的更多信息,请参阅此处的示例仓库
Vercel
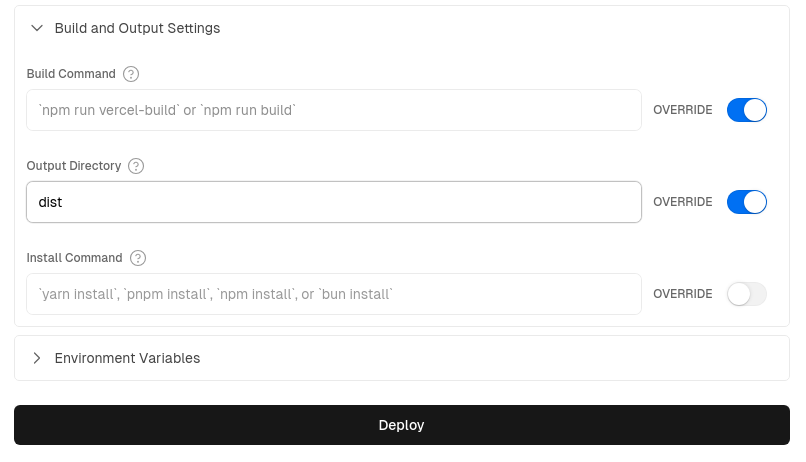
步骤 1:设置 Vercel
在 Vercel Web UI 中...
- 创建一个新项目
- 确保
- “构建命令” 留空,并启用覆盖
- “输出目录” 更改为 dist(这是 Trunk 构建的默认输出目录),并启用覆盖
步骤 2:为 GitHub Actions 添加 Vercel 凭据
注意:预览和部署操作都需要在 GitHub secrets 中设置你的 Vercel 凭据
-
通过转到“帐户设置”>“令牌”并创建一个新令牌来获取你的 Vercel 访问令牌 - 保存该令牌以在下面的子步骤 5 中使用。
-
使用
npm i -g vercel命令安装 Vercel CLI,然后运行vercel login登录到你的帐户。 -
在你的文件夹中,运行
vercel link创建一个新的 Vercel 项目;在 CLI 中,你将被问到“链接到现有项目吗?” - 回答是,然后输入你在步骤 1 中创建的名称。将为你创建一个新的.vercel文件夹。 -
在生成的
.vercel文件夹中,打开project.json文件并保存“projectId”和“orgId”以用于下一步。 -
在 GitHub 中,转到仓库的“设置”>“密钥和变量”>“操作”,并将以下内容添加为 仓库密钥:
- 将你的 Vercel 访问令牌(来自子步骤 1)保存为
VERCEL_TOKEN密钥 - 从
.vercel/project.json添加“projectID”作为VERCEL_PROJECT_ID - 从
.vercel/project.json添加“orgId”作为VERCEL_ORG_ID
- 将你的 Vercel 访问令牌(来自子步骤 1)保存为
有关完整说明,请参阅 “如何在 Vercel 中使用 Github Actions”
步骤 3:添加 Github Action 脚本
最后,你只需从下方或 示例仓库的 .github/workflows/ 文件夹 中复制粘贴这两个文件——一个用于部署,一个用于 PR 预览——到你的 Github 工作流文件夹中,然后,在你的下一次提交或 PR 时,部署将自动进行。
生产部署脚本:vercel_deploy.yml
Example
name: 发布到 Vercel
on: push: branches:
- main env: CARGO_TERM_COLOR: always VERCEL_ORG_ID: ${{ secrets.VERCEL_ORG_ID }} VERCEL_PROJECT_ID: ${{ secrets.VERCEL_PROJECT_ID }}
jobs: Vercel-Production-Deployment: runs-on: ubuntu-latest environment: production steps:
-
name: git-checkout uses: actions/checkout@v3
-
uses: dtolnay/rust-toolchain@nightly with: components: clippy, rustfmt
-
uses: Swatinem/rust-cache@v2
-
name: 设置 Rust run: | rustup target add wasm32-unknown-unknown cargo clippy cargo fmt --check
-
name: 下载并安装 Trunk 二进制文件 run: wget -qO- https://github.com/trunk-rs/trunk/releases/download/v0.18.2/trunk-x86_64-unknown-linux-gnu.tar.gz | tar -xzf-
-
name: 使用 Trunk 构建 run: ./trunk build --release
-
name: 安装 Vercel CLI run: npm install --global vercel@latest
-
name: 拉取 Vercel 环境信息 run: vercel pull --yes --environment=production --token=${{ secrets.VERCEL_TOKEN }}
-
name: 部署到 Vercel 并显示 URL id: deployment working-directory: ./dist run: | vercel deploy --prod --token=${{ secrets.VERCEL_TOKEN }} >> $GITHUB_STEP_SUMMARY echo $GITHUB_STEP_SUMMARY
预览部署脚本:vercel_preview.yml
Example
有关 Vercel 操作的更多信息,请参阅:
https://github.com/amondnet/vercel-action
name: Leptos CSR Vercel 预览
on: pull_request: branches: [ "main" ]
workflow_dispatch:
env: CARGO_TERM_COLOR: always VERCEL_ORG_ID: ${{ secrets.VERCEL_ORG_ID }} VERCEL_PROJECT_ID: ${{ secrets.VERCEL_PROJECT_ID }}
jobs: fmt: name: Rustfmt runs-on: ubuntu-latest steps:
- uses: actions/checkout@v4
- uses: dtolnay/rust-toolchain@nightly with: components: rustfmt
- name: 强制格式化 run: cargo fmt --check
clippy: name: Clippy runs-on: ubuntu-latest steps:
- uses: actions/checkout@v4
- uses: dtolnay/rust-toolchain@nightly with: components: clippy
- uses: Swatinem/rust-cache@v2
- name: Lint run: cargo clippy -- -D warnings
test: name: 测试 runs-on: ubuntu-latest needs: [fmt, clippy] steps:
- uses: actions/checkout@v4
- uses: dtolnay/rust-toolchain@nightly
- uses: Swatinem/rust-cache@v2
- name: 运行测试 run: cargo test
build-and-preview-deploy: runs-on: ubuntu-latest name: 构建和预览
needs: [test, clippy, fmt]
permissions: pull-requests: write
environment: name: preview url: ${{ steps.preview.outputs.preview-url }}
steps:
-
name: git-checkout uses: actions/checkout@v4
-
uses: dtolnay/rust-toolchain@nightly
-
uses: Swatinem/rust-cache@v2
-
name: 构建 run: rustup target add wasm32-unknown-unknown
-
name: 下载并安装 Trunk 二进制文件 run: wget -qO- https://github.com/trunk-rs/trunk/releases/download/v0.18.2/trunk-x86_64-unknown-linux-gnu.tar.gz | tar -xzf-
-
name: 使用 Trunk 构建 run: ./trunk build --release
-
name: 预览部署 id: preview uses: amondnet/[email protected] with: vercel-token: ${{ secrets.VERCEL_TOKEN }} github-token: ${{ secrets.GITHUB_TOKEN }} vercel-org-id: ${{ secrets.VERCEL_ORG_ID }} vercel-project-id: ${{ secrets.VERCEL_PROJECT_ID }} github-comment: true working-directory: ./dist
-
name: 显示已部署 URL run: | echo "已部署的应用程序 URL:${{ steps.preview.outputs.preview-url }}" >> $GITHUB_STEP_SUMMARY
有关更多信息,请参阅 此处的示例仓库。
Spin - 无服务器 WebAssembly
另一种选择是使用 Spin 等无服务器平台。虽然 Spin 是开源的,你可以在自己的基础设施上运行它(例如在 Kubernetes 内部),但在生产环境中开始使用 Spin 最简单的方法是使用 Fermyon Cloud。
首先按照 此处的说明 安装 Spin CLI,并为你的 Leptos CSR 项目创建一个 Github 仓库(如果你还没有这样做)。
-
打开“Fermyon Cloud”>“用户设置”。如果你尚未登录,请选择“使用 GitHub 登录”按钮。
-
在“个人访问令牌”中,选择“添加令牌”。输入名称“gh_actions”并单击“创建令牌”。
-
Fermyon Cloud 将显示该令牌;单击复制按钮将其复制到剪贴板。
-
进入你的 Github 仓库,打开“设置”>“密钥和变量”>“操作”,并将 Fermyon 云令牌添加到“存储库密钥”中,使用变量名“FERMYON_CLOUD_TOKEN”
-
将以下 Github Actions 脚本(如下)复制并粘贴到你的
.github/workflows/<SCRIPT_NAME>.yml文件中 -
激活“预览”和“部署”脚本后,Github Actions 现在将在拉取请求时生成预览,并在更新到“主”分支时自动部署。
生产部署脚本:spin_deploy.yml
Example
有关 Fermyon Cloud 所需的设置说明,请参阅:
https://developer.fermyon.com/cloud/github-actions
供参考,请参阅:
https://developer.fermyon.com/cloud/changelog/gh-actions-spin-deploy
对于 Fermyon gh 操作本身,请参阅:
https://github.com/fermyon/actions
name: 发布到 Spin Cloud
on: push: branches: [main] workflow_dispatch:
permissions: contents: read id-token: write
仅允许一个并发部署,跳过正在运行的运行和最新排队的运行之间排队的运行。
但是,不要取消正在进行的运行,因为我们希望允许这些生产部署完成。
concurrency: group: "spin" cancel-in-progress: false
jobs: Spin-Release:
timeout-minutes: 10
environment: name: production url: ${{ steps.deployment.outputs.app-url }}
runs-on: ubuntu-latest
steps:
- uses: actions/checkout@v4 # repo checkout
安装 Rust Nightly 工具链,包括 Clippy 和 Rustfmt
-
name: 安装 nightly Rust uses: dtolnay/rust-toolchain@nightly with: components: clippy, rustfmt
-
name: 添加 WASM 和 WASI 目标 run: rustup target add wasm32-unknown-unknown && rustup target add wasm32-wasi
-
name: lint run: cargo clippy & cargo fmt
如果使用 tailwind...
- name: 下载并安装 tailwindcss 二进制文件
run: npm install -D tailwindcss && npx tailwindcss -i <INPUT/PATH.css> -o <OUTPUT/PATH.css> # 运行 tailwind
-
name: 下载并安装 Trunk 二进制文件 run: wget -qO- https://github.com/trunk-rs/trunk/releases/download/v0.18.2/trunk-x86_64-unknown-linux-gnu.tar.gz | tar -xzf-
-
name: 使用 Trunk 构建 run: ./trunk build --release
安装 Spin CLI 并部署
- name: 设置 Spin uses: fermyon/actions/spin/setup@v1
with:
plugins:
- name: 构建和部署 id: deployment uses: fermyon/actions/spin/deploy@v1 with: fermyon_token: ${{ secrets.FERMYON_CLOUD_TOKEN }}
key_values: |-
# abc=xyz
# foo=bar
variables: |-
# password=${{ secrets.SECURE_PASSWORD }}
# apikey=${{ secrets.API_KEY }}
创建一条显式消息以显示已部署应用程序的 URL,以及在作业图中显示
- name: 已部署的 URL run: | echo "已部署的应用程序 URL:${{ steps.deployment.outputs.app-url }}" >> $GITHUB_STEP_SUMMARY
预览部署脚本:spin_preview.yml
Example
有关 Fermyon Cloud 所需的设置说明,请参阅:
https://developer.fermyon.com/cloud/github-actions
对于 Fermyon gh 操作本身,请参阅:
https://github.com/fermyon/actions
具体来说:
https://github.com/fermyon/actions?tab=readme-ov-file#deploy-preview-of-spin-app-to-fermyon-cloud---fermyonactionsspinpreviewv1
name: 在 Spin Cloud 上预览
on: pull_request: branches: ["main", "v*"] types: ['opened', 'synchronize', 'reopened', 'closed'] workflow_dispatch:
permissions: contents: read pull-requests: write
仅允许一个并发部署,跳过正在运行的运行和最新排队的运行之间排队的运行。
但是,不要取消正在进行的运行,因为我们希望允许这些生产部署完成。
concurrency: group: "spin" cancel-in-progress: false
jobs: Spin-Preview:
timeout-minutes: 10
environment: name: preview url: ${{ steps.preview.outputs.app-url }}
runs-on: ubuntu-latest
steps:
- uses: actions/checkout@v4 # repo checkout
安装 Rust Nightly 工具链,包括 Clippy 和 Rustfmt
-
name: 安装 nightly Rust uses: dtolnay/rust-toolchain@nightly with: components: clippy, rustfmt
-
name: 添加 WASM 和 WASI 目标 run: rustup target add wasm32-unknown-unknown && rustup target add wasm32-wasi
-
name: lint run: cargo clippy & cargo fmt
如果使用 tailwind...
- name: 下载并安装 tailwindcss 二进制文件
run: npm install -D tailwindcss && npx tailwindcss -i <INPUT/PATH.css> -o <OUTPUT/PATH.css> # 运行 tailwind
-
name: 下载并安装 Trunk 二进制文件 run: wget -qO- https://github.com/trunk-rs/trunk/releases/download/v0.18.2/trunk-x86_64-unknown-linux-gnu.tar.gz | tar -xzf-
-
name: 使用 Trunk 构建 run: ./trunk build --release
安装 Spin CLI 并部署
- name: 设置 Spin uses: fermyon/actions/spin/setup@v1
with:
plugins:
- name: 构建和预览 id: preview uses: fermyon/actions/spin/preview@v1 with: fermyon_token: ${{ secrets.FERMYON_CLOUD_TOKEN }} github_token: ${{ secrets.GITHUB_TOKEN }} undeploy: ${{ github.event.pull_request && github.event.action == 'closed' }}
key_values: |-
# abc=xyz
# foo=bar
variables: |-
# password=${{ secrets.SECURE_PASSWORD }}
# apikey=${{ secrets.API_KEY }}
- name: 显示已部署 URL run: | echo "已部署的应用程序 URL:${{ steps.preview.outputs.app-url }}" >> $GITHUB_STEP_SUMMARY
请参阅 此处的示例仓库。